|
<< Click to Display Table of Contents >> Item Details (Create, Display & Update) |
  
|
|
<< Click to Display Table of Contents >> Item Details (Create, Display & Update) |
  
|
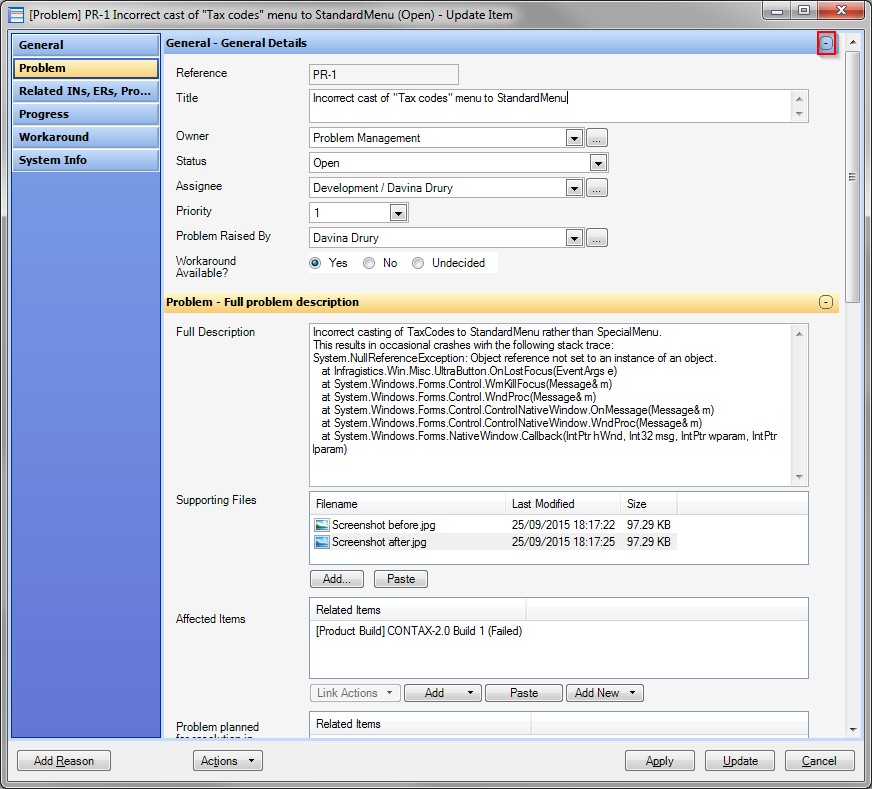
The Item Details window is used to Create, Display & Update Items (specifically the Attributes of items)

The image above is an example of an item that has been opened for update.
The left-hand column contains a list of Sections. Clicking on one of these Sections takes you to the corresponding Section on the right hand side of the screen. The administrator controls what Sections the item has, which attributes are in which Section and how large the area for an attribute is (for those that have variable sizing possible)
Each section may be collapsed or expanded via the + - indicator in the section's header (and highlighted in the image above). The administrator is able to determine whether each section should be collapsed or expanded when viewing the item.
| • | Which attributes items of this Item Type will have |
| • | The layout of the Window |
| • | The description and pop-up help of each attribute |
| • | Attribute valid values (e.g. a range within which a numeric value must be. This could include a comparison with another field.) |
| • | Threshold colour (e.g. if the value of a Attribute1 is less than Attribute2 then turn them both Red otherwise if Attribute1 is greater than Attribute3 then turn Attribute2 Green) |
| • | The length (number of characters) an Attribute can have (e.g. an Address could be limited to a maximum length of 200 characters) |
| • | For Relationship Attributes, which items are eligible, and therefore which will appear in the Select Items Window when the user tries to Add a Relationship from the current Item to another one. |
| • | Whether an attribute is optional or mandatory |
| • | Whether an attribute is optional or mandatory when it has a specific Status |
| • | Whether an attribute is hidden from the Item Details form |
| • | Whether an attribute is hidden when a list of items of that Item Type is displayed |
| • | Whether a current User/Group has the security privileges required to create it / update it at a specific Status |
The Following is true of all Attributes...
Attribute State
The item's attributes are coloured to indicate whether they are updateable, read-only or mandatory:
| • | Grey background Read-only |

| • | White background Updateable (Create/Update only) |

| • | Blue background Mandatory (Create/Update only) |

The administrator determines, by a series of rules, which attributes are read only and mandatory. These rules can be set to apply depending on the item's status.
Additionally, security rules determine what users have access to which attributes and at what state. See Security for more information
All attributes may have validation criteria that has been set by the administrator. This can include simple validation (e.g. attribute must be between 1 and 100) and cross-field validation (e.g. attribute A must be greater than attribute B)
When moving the cursor out of an attribute field the value is immediately validated and any errors are highlighted. When you click to create or update the item the mandatory fields are checked for completeness.
Attribute Descriptions
Your administrator may set help-text that describes the usage of particular Attributes. Hovering the mouse pointer over the Attribute's label shows this help text.

Invalid Attribute Values
When an Attribute has an invalid value an indicator appears. Hovering over the indicator reveals the error detail

Attribute Colouring
The administrator can define rules that determine the foreground and background colour of an Attribute. So for example if an item has an Attribute representing an SLA date then the rules might determine that once that date is passed the Attribute is coloured red to bring it to the user's attention:
![]()
Or perhaps a colour to highlight a status:
![]()
System-Managed Attributes
Some Attributes are updated by the system and may not be changed by the user. Some of these are Cimera-defined Attributes (and are displayed in the System Info section) but your administrator may have added more. For example there may be a Risk item that contains three Attributes: Likelihood, Impact and Risk Level. The user supplies the Likelihood and Impact and the system determines a corresponding Risk Level when the item is saved. This Risk Level Attribute would not be modifiable by the user and would appear as a read-only attribute.
When is an Attribute not an Attribute?
When it is a relationship
As well as Attributes an Item Type also defines what other Item Types an item can be related, or linked, to. This appears in the Item Display as the other attributes do but is actually an Item Relationship control listing the relationships the item has.
When it is a custom action
A custom action / PlugIin of type CimeraPlugInCustomAction can be made to appear on the Item Details form as a button. When clicked the item is passed to the PlugIn to perform whatever action it is coded to perform. See Custom Reports, Helpers & PlugIns