Attribute Types

<< Click to Display Table of Contents >>

Navigation:  Using Cimera > Displaying and Managing Items > Item Details (Create, Display & Update) >

Attribute Types

Previous pageReturn to chapter overviewNext page

The Attribute Type determines how each Attribute is displayed and how the user interacts with it.


Every Attribute of an item is configured by your administrator to be of one of the following Attribute Types. Your administrator will further configure any default values, any validation and how it is presented to the users. Validation can also be performed in conjunction with other Attributes (for example if Attribute A is set to "High" then Attribute B can only contain 1 or 2).


The different types of Attribute, and how they appear on the screen, are described below:


Alphanumeric


The alphanumeric box is the most common control and can store alphanumeric data (letters, numbers & special characters). It can be presented as one or multiple lines. It has a maximum length of 255 characters


Att Type - Alpha


The Cimera Administrator can define rules to restrict the data that can be entered into it.


Length

The maximum number of characters


Valid Values

A Regular Expression can be defined to validate the entered data by pattern matching. This could for example ensure that a valid format telephone number or web address has been supplied.


Text


The text box can store alphanumeric data. It can be presented as one or multiple lines.  It has a maximum length of 32767 characters. This is similar to the alphanumeric attribute but can contain more data. However, the data cannot be queried via CQL or the Structured Query (it is still indexed for the Full Text Search) and the Attribute will not appear as a column in a list of items.


Integer

A 64 bit integer. Range --9,223,372,036,854,775,808 to 9,223,372,036,854,775,807.


Valid Values

A minimum / maximum range, e.g. 0 to 100


Float


A floating point number. Absolute minimum / maximum values are  -10308 to +10324.


Valid Values

A minimum / maximum range, e.g. -9.99 to 9.99


Hexadecimal

A 64 bit integer expressed as a hexadecimal e.g. 31AC2D. Range 0 to FFFFFFFFFFFFFFFF.


Valid Values

A minimum / maximum range expressed as an integer, e.g. 0 to 65535


Binary


A 64 bit integer expressed as a binary value e.g. 00110101. Range 0 to (64 1s)


Valid Values

A minimum / maximum range expressed as an integer, e.g. 0 to 65535


History


The History attribute is special instance of a Text attribute.

Att Type - History


The control is presented in two sections.

The top section is a read only and contains the existing text.
The bottom section is a text box into which new text can be entered.


When the Item is created / updated the text is copied from the bottom section to the top section and prefixed with UTC Date / Time and user name (the user's name at that point in time)


The purpose of this attribute is to provide an ongoing record of what has happened to the item but in a secure way so that previous comments cannot be altered.


The History attribute can contain a virtually unlimited amount of text however each entry is limited to 32767 characters.
 

Date


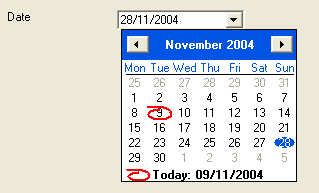
Used to hold a date. The user can enter a date in most standard formats (e.g. 1/1/2010 or 1-1-10 and sensitive to the user's locale) or select from the drop down calendar.


Att Type - Date


Valid Date Range

A minimum / maximum date


The minimum / maximum dates can be defined by the administrator to be relative to the current date or date and time by using the keywords NOW (current date and time) and TODAY (midnight of the current day).


NOW and TODAY can also be modified by adding or subtracting a number of days / hours / minutes or even working days / hours / minutes (according to the Working Calendar that the administrator has defined).


If a Valid Date Range has been set then the attribute will not let you either click or type a date outside that range.


Time


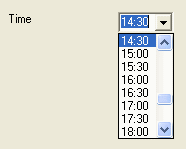
Used to hold a time. To update a time either enter the hours & minutes or select from the drop down list.


Att Type - Time


Valid Time Range

A valid time range can be specified by the administrator. For example, an attribute Deployment Time could be set to be in the Range 08:00 - 19:00


If a Valid Time Range has been set then it will not be possible to enter a time outside that range.


Date Time


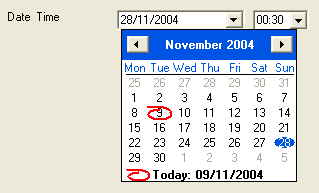
A combination of a Date and a Time - see above


Att Type - DateTime


Yes No


Stores a Boolean True or False, however it actually has a third state to effectively represent a null value (i.e. neither has been selected).


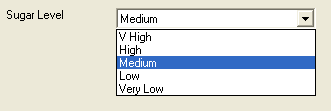
Only one value can be selected.  The label for each of the three values may be modified for any given attribute. For example you could have True, False, Unknown or On, Off, Unset or Up, Down, Don't Know


If the administrator has determined this to be a mandatory Attribute then the third option will not be displayed as a null value is not possible.
 

Att Type - YesNo


Selection List


Stores a single text value either selected from a drop down list of possible values or freely entered (maximum length 255 characters).

Att Type - Selection


Valid Values

The administrator supplies the possible values that populate the drop down


Typing a letter will jump to the next value in the list beginning with that letter


Selection List Restricted


A variant of a Selection List where the value is restricted so that it is only possible to select a value that is in the drop down list.


Group


Holds a Cimera Group which may be selected from a drop down list or by pressing a button to the right to select from all groups.


Group Attribute


The drop down list is populated with <blank> which allows the attribute to be cleared (pressing the Delete key when the control has focus also allows this). It is also populated with all the Groups that the user is currently a member of.


User


Holds a Cimera User which may be selected from a drop down list or by pressing a button to the right to select from all users.


User Attribute


The drop down list is populated with <blank> which allows the attribute to be cleared (pressing the Delete key when the control has focus also allows this). It is also populated with the current user.


Group User


Holds a Cimera User in the context of one of their Groups which may be selected from a drop down list or by pressing a button to the right for advanced selection options.


Group User Attribute


It allows selecting a Group or a Group & User combination. Your administrator will determine whether it is permissible to only specify a Group or whether a User must also be specified


The drop down list is populated with <blank> which allows the attribute to be cleared (pressing the Delete key when the control has focus also allows this). It is also populated with all combinations of the current user in the context of the Groups that they are members of.


Pressing the button to the right gives options for finding the required Group or Group & User.


GroupUser button drop down


File Attachments


Stores one or more files in the Cimera Item Library.


Att Type - Attachments


An attached file cannot be changed.  If changes are required then remove the old version and add the new version.


AddTake a file from the file system, add it to the Item Library and attach it to the current Item.


PasteTakes the contents of the windows clipboard and attaches it to the the item. If the windows clipboard contains files then these will simply be attached. However Cimera is smarter than that:
 
If the clipboard contains a bitmap image (e.g. after pressing the Print Screen key) then Cimera will create a new temporary file with a .jpg extension, save the bitmap data to it and then attach it to the item
 
If the clipboard contains text data then Cimera will create a new temporary file with a .txt extension, save the text data to it and then attach it to the item

 
To add an attachment of any other type, create it separately and attach it using the Add button, or by dragging and dropping it onto the attachment control.


OpenOpen the file, changes made cannot be directly saved back into Cimera. Make the changes and re-add the updated file as a new attachment.


Save Save a copy of the file to a user specified location.        


RemoveRemove the attachment from the item. The file is not deleted from the Item Library.


PropertiesShow the properties of the attachment, this includes the original file path of the object and its Item Library ID.


F2 (rename)Change the display name. Note: the attachment is identified by, and stored under, its internal Item Library ID, and not its display name.


Dragging & DroppingFiles (one or many) may be dragged and dropped onto the attachment control to attach them to the current item. You can also drag and drop files from the attachments control to the computer's file system to take a copy.
You may also drag and drop files between Cimera items.


Item Relationship


Whilst this control will appear on the form when displaying an item this is not actually an attribute of the item. It is used to manage relationships with other items.


The administrator will determine how the linked items appear in the list. By default only the Object Spec of the target item is listed. This is the most efficient configuration as it is very quick for Cimera to simply get this brief information.


Item Relationship


Alternatively the administrator may determine that the users need to see more details about the target items in this view and the list will instead contain a full Item List


If the type of Valid Link that is being displayed also contains Link data (i.e. the Link is defined as having attributes) then the attributes of the Link are shown alongside the Object Spec:


Link with attributes


There is currently no view that merges the full Item List view with the Link attributes view


Right-clicking on listed items gives options related to the target items (as per Item List).


WARNING! Do not confuse the Delete option on the right-click of a target item with the Remove Relationship option on the Link Actions menu.The former deletes an item, the latter deletes a link between 2 items.


Link Actions


To perform actions on the link select the appropriate action from the Link Actions button drop down menu. The button is only enabled if one or more links have been selected.


Link Actions button drop down


Display relationship detailsDisplay the details of the Relationship (see Item Details (Create, Display & Update) Window)
Update relationshipUpdate the Relationship details. This will only be useful if the Link has attributes defined on it, otherwise there is nothing possible to change.
Show history of relationshipShow the History of the relationship (see History (Actions) Window).
Remove relationshipDelete the Relationship (the Items that form the relationship are not affected but the link is broken)


WARNING! Do not confuse the Delete option on the right-click of a target item with the Remove Relationship option on the Link Actions menu!


Add

Launches the Select Items Window to select the item you wish to relate to the current item


Add New

Create a new item and relate it to the current item.

Not available if the relationship is to be for a Version.  To relate to a new Version select "Add" and create a new Version from the Select Items Window.


Paste

Creates a new relationship with the item(s) currently stored in the Cimera Clipboard. If the item(s) in the clipboard are not valid target items (due to not being a suitable Item Type or at an inappropriate status) then an error message is displayed and the action is cancelled.


Note: The administrator may restrict the use of the any of the buttons for a particular relationship in which case they will not appear on the screen


See Also

Difference between Relationship Explorer & Item Details in displaying Relationships